The Datadog Mule Integration from IO Connect Services is an excellent tool for monitoring the health of your Mule® servers, applications, and other IT infrastructure. The instructions for the installation are simple and easy to follow. Due to the nature of the Docker Datadog® Agent, you may configure one agent or server for each of your Anypoint® Environments, which can increase your infrastructure costs. This article proposes a workaround where you can run the Datadog Mule Integration using Datadog Docker Container Monitoring for all your lower environments with only one server.
The following procedure is not an official method for the Datadog Mule Integration installation. We highly recommend that it be used only for testing purposes and /or in lower environments, never in production, because IO Connect Services does not support this approach.
One machine with Docker installed where the agent will be deployed, such as an AWS EC2 instance.
To run the Datadog Mule Integration, you will need two files. The first one is the conf.yml which is the configuration file for the Datadog Mule Integration. This file must be previously edited with the configuration required for your environments, and you can find the instructions for how to edit this file under the following link: https://docs.ioconnectservices.com/cmi/configuration You can also download an example file here: https://docs.ioconnectservices.com/cmi/configuration#full_example
Once you have your con.yml file ready, you can create the second one, the Docker file.
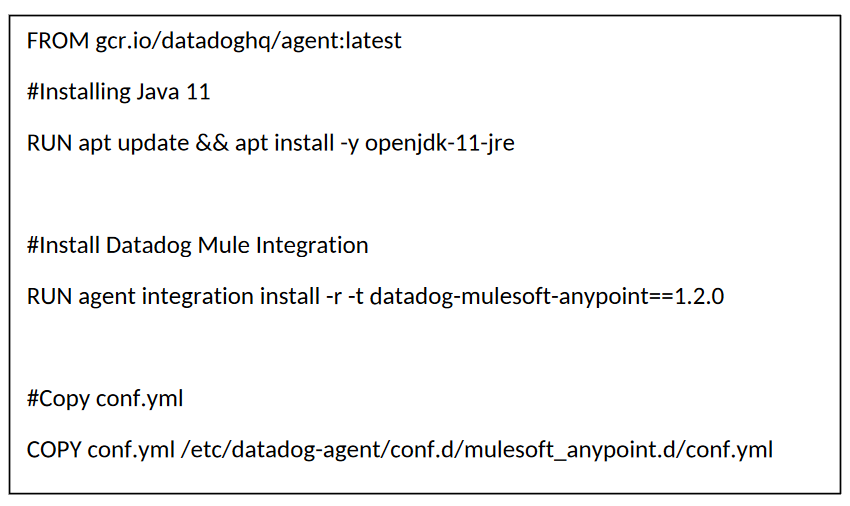
The Docker file we test and that is proposed for this article is the following:

This snipped points to the datadog-mulesoft-anypoint v1.2.0, currently the latest stable version. To write this article, you are free to change the latest version if required.
Place the lines inside a file with the name “dockerfile”. This file will take the official Datadog Agent Docker image to configure and install all the requirements to run the Datadog Mule Integration. You must have both, conf.yml and dockerfile, in the same directory.
When the files are, you need to open a command-line tool and go into the files created before the directory.
First, you need to build the Docker image using the following command:
Once the build command finishes, you need to execute the image using this command replacing <YOUR_API_KEY> by your DataDog API_KEY:
This will create a Docker container with the datadog-mulesoft-anypoint integration installed over the latest Docker Datadog Agent using the configuration provided inside the conf.yml file.
The only thing you need to do to run multiple agents in one instance is to reproduce the steps in “Run your agent” with the following changes:
With these changes, it is sufficient to monitor your different Anypoint environments with Datadog before running the Docker container.
As mentioned before, this article describes an approach that IO Connect Services does not support. However, this method allows you to monitor all your environments using only one server, avoiding maintenance and configuration for different instances. Therefore, it is an easy and practical way to test the Datadog Mule Integration with a low infrastructure